How to Build Your Own Android Kernel
Introduction
What is Android Kernel

On an Android, a kernel is the core program that manages the CPU resources, the system memory, the system devices, including the file systems and networking, and is responsible for managing all the processes.
Why Kernel is Important!
It basically manages operations of memory and CPU time. It is core component of an operating system. Kernel acts as a bridge between applications and data processing performed at hardware level using inter-process communication and system calls.
Prerequisites
1.A Computer & Internet
2.Little C Knowledge
3.Common Sense :)
Lets Begin
Setup your Windows Machine
Download VMWare or VirtualBox for setup the guest Machine.
Then Download Linux ISO File. Note. Suggested Linux:Ubuntu or Kali Linux
Create a new Virtual Machine using this guide How to make a New Virtual Machine
If you know how to create a Virtual Machine then skip this step.
Setup your Linux Machine
Now Turn ON your Virtual Machine and setup initial things like account and stuff.
After doing all first boot initial things... Now the main part starts...
After that run this in your sudo terminal apt install default-jdk git-core gnupg flex bison gperf build-essential zip curl libc6-dev libncurses5-dev x11proto-core-dev libx11-dev libreadline6-dev libgl1-mesa-glx libgl1-mesa-dev python3 make sudo gcc g++ bc grep tofrodos python3-markdown libxml2-utils xsltproc zlib1g-dev
Gathering Device Info and Source
Now Start gathering your device details like Codename, Processor, Board, etc.
There are few ways through which you can find these things and the simplest way is using a simple app name CPU-Z.
After gathering device details, Now you need to find kernel source code for your device over the internet
I suggest you to first go through the github repos to find your device's Kernel source code.
Usually developers use a name format to name their repo's on github like android_kernel_brand_codename
For example "android_kernel_xiaomi_dior"
Now select the branch of your desired Android Version like Pie, Q , R , S , T and copy the git repo code and keep noted the branch name
Now Open Terminal in your Linux and Make a folder named Kernel using mkdir Kernel command and cd Kernel.
Now type git clone (git repo code) -b (branch name)
For Example git clone https://github.com/PixelExperience-Devices/device_xiaomi_begonia.git -b twelve
If it shows an error like git not found or something.. use sudo apt install git to install git.
After downloading kernel source you need to download few more files like
Kali Nethunter Kernel Builder Gitlab Repo
Kali Nethunter Installer Gitlab Repo
and In Installer folder run the bootstrap.sh to sync the devices.
Now copy the Kali Nethunter Kernel Folder in your Kernel Source
And go to Nethunter Install then Run the build.sh using bash build.sh
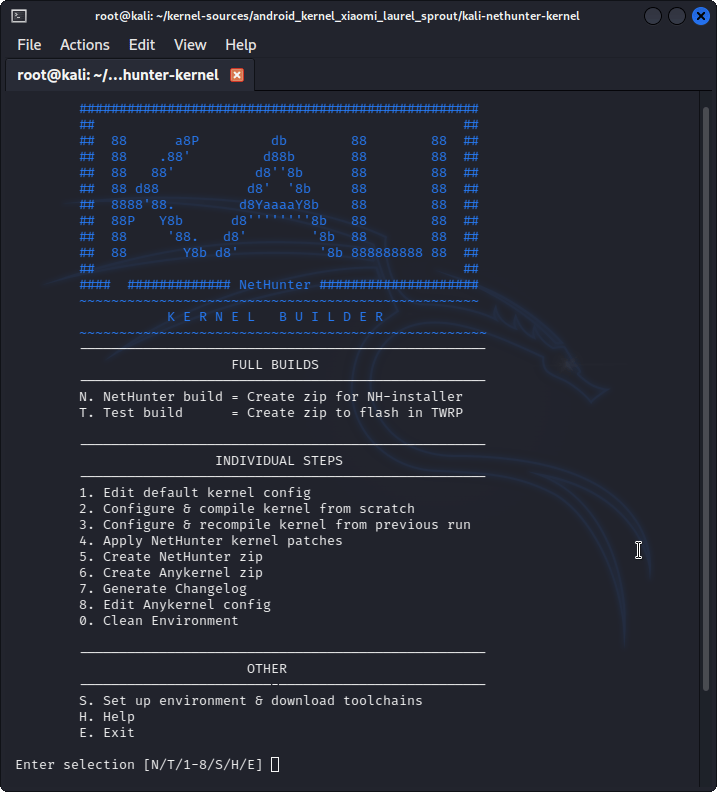
After running the script.. Setup the environment and Download Toolchains

The Compiling Process
After setuping the environment, Patch your kernel source by choosing options of your kernel version
Know your kernel version by running make kernelversion in terminal at device kernel source folder.
Now it's time to edit the defconfig file by choosing the Edit Default Kernel Config in build Menu.
Use this guide to edit the Kernel Config.

After Editing and Saving the defconfig.
Go back to the Build Main Menu and choose option 2 to compile your kernel from Scratch.
You can also use your own custom building script to make the process easy.
I'm sharing youMy compiling Scripts and Stuff.
If you face any error comment us. We will try to figure it out.
If the compilation is successful then copy your modules and Image from Out and Module_Out folder.
Note: Warnings can be ignored.
Paste the modules and Image in Kali Nethunter Project folder to add your device by reading the documentation.
And now just pack the Kernel using Python3 Build Script in kali-nethunter-project folder.
CONGRATULATIONS. You Have Successfully Build your Own Android Kernel
Testing Your Kernel
Go to TWRP and Take Backup of your current Boot Partition
Then flash your new Kernel.zip
Note. First Boot may take time so be patient
Common Errors
as: unrecognized option '-EL
Usually, this means that `CROSS_COMPILE` is not set correctly. Check that variable as well as your `PATH` to make sure that the required tools are available for Clang to invoke. You can test it manually like tihs:$ ${CROSS_COMPILE}ld -v
GNU ld (GNU Binutils) 2.34
If you see `Command not found` or any other error, one of the two variables mentioned above is most likely set incorrectly. If you continue to encounter this error after verifying `CROSS_COMPILE` and `PATH`, you are probably running into a change in Clang 12's handling of cross-compiling.
The fix is to either merge linux-stable (which already has the fix included) cherry-pick "Makefile: Fix GCC_TOOLCHAIN_DIR prefix for Clang cross compilation" manually.
If the error still continues to appear and you have an arm64 kernel that includes vdso32, you will also need to cherry-pick arm64: vdso32: Fix '--prefix=' value for newer versions of clang to fix the second vdso32 error. Merging linux-stable is also an option if you are on Linux 5.4 or newer.
Cannot use CONFIG_CC_STACKPROTECTOR_STRONG: -fstack-protector-strong not supported by compiler
This error is actually a result of stack protector checks in the Makefile that cause the real error to be masked.It indicates that one or more unsupported compiler flags have been passed to Clang. Disable CONFIG_CC_STACKPROTECTOR_STRONG` in favor of `CONFIG_CC_STACKPROTECTOR_NONE` temporarily (make sure you don't keep this change permanently for security reasons) and Clang will output the flag that is causing the problem.
In downstream kernels, the cause is usually big.LITTLE CPU optimization flags that have been added to the Makefile unconditionally. The correct solution is to check `cc-name` for the current compiler and adjust the optimization flags accordingly — big.LITTLE for GCC and little-only for Clang. See ["Makefile: Optimize for sm8150's Kryo 485 CPU setup"]for an example implementation of this.